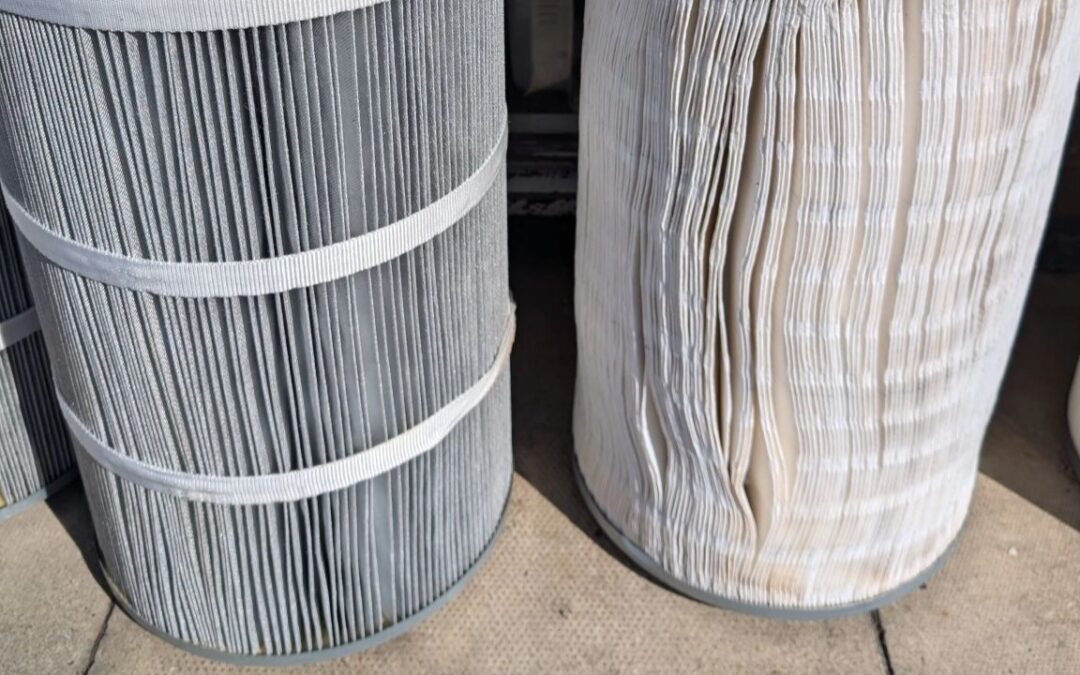
If you’re looking for a cost-effective and sustainable solution for your filtration needs, consider switching to polyester filters. At Sonic Solutions, we’ve seen firsthand the remarkable benefits these filters offer compared to traditional paper filters.
Key Advantages of Polyester Filters
1. Durability and Longevity
Multiple Uses: Polyester filters can be cleaned and reused multiple times without losing efficiency.
Extended Lifespan: These filters last significantly longer than paper filters, which often need frequent replacements.
2. Cost Savings
Long-Term Savings: Though the initial cost of polyester filters may be higher, their extended lifespan and reusability result in substantial savings over time.
Maximised Efficiency: Our professional cleaning service ensures your filters are used to their maximum potential, potentially saving you thousands in replacement costs.
3. Environmental Benefits
Reduce Waste: Switching to reusable polyester filters helps reduce landfill waste.
Sustainability Efforts: By minimising disposable filter usage, you contribute to broader environmental sustainability efforts.
4. High Performance
Consistent Quality: Polyester filters maintain high performance even after multiple cleanings.
Efficient Systems: They ensure consistent air quality and system efficiency, keeping your operations running smoothly.
Why Polyester Filters Are a Smart Investment
Polyester filters are designed to withstand the rigours of industrial environments. Unlike paper filters that deteriorate quickly, polyester filters maintain their integrity and efficiency through multiple cleaning cycles. This durability translates to fewer replacements and less downtime, ensuring that your operations remain uninterrupted.
The Environmental Impact
Reducing waste is a critical component of any sustainable business strategy. By choosing polyester filters, you are directly contributing to a reduction in landfill waste. Each polyester filter can replace dozens of paper filters, significantly lowering your environmental footprint. This switch not only benefits the planet but also aligns with increasing regulatory and consumer demands for sustainable business practices.
Cost Efficiency in Detail
The initial investment in polyester filters is offset by their longevity and reusability. Over time, the cost savings become evident as the need for frequent replacements diminishes. Furthermore, our expert cleaning services ensure that each filter is maintained in optimal condition, extending its usable life and enhancing its performance. This approach maximises your return on investment and reduces the total cost of ownership for your filtration systems.
Enhanced Performance and Reliability
Polyester filters are engineered to provide consistent high performance. Even after multiple cleaning cycles, they continue to deliver reliable filtration, ensuring that your systems operate at peak efficiency. This reliability is crucial for maintaining air quality and protecting sensitive equipment from contaminants, ultimately prolonging the lifespan of your machinery and reducing maintenance costs.
Partnering with Sonic Solutions
At Sonic Solutions, we are committed to helping our clients achieve their sustainability and efficiency goals. Our comprehensive filter cleaning services are designed to maximise the benefits of polyester filters. We offer professional cleaning to ensure that your filters are always in top condition. Don’t let upfront costs deter you, invest in long-term benefits and make a positive impact on both your budget and the environment.
By choosing polyester filters and outsourcing your filter cleaning to Sonic Solutions, you can enjoy significant cost savings, contribute to environmental sustainability, and maintain high performance in your air filtration systems.
For more information on how we can help you transition to polyester filters and maintain your systems efficiently, contact Sonic Solutions today.
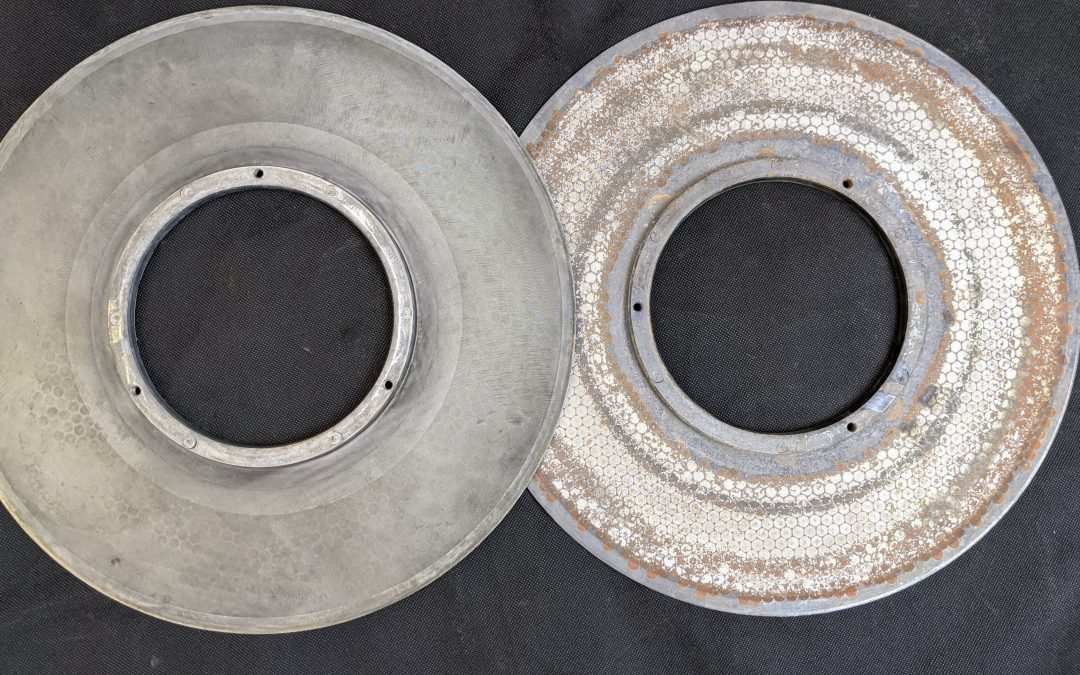
Erema are probably the most popular brand in the UK of machinery to make pellets from recycled plastics. Their system of continuous hot melt filtration allows for high productivity of an extremely pure product.
The laser cut discs through which recycled product is melted and passed through prior to pelletisation are key to the entire process. If they get blocked (or blinded) then pressure builds up and throughput drops. Worse, if the pressure causes the disc to burst then impurities enter the finished product. Proper maintenance of these discs is therefore critical. In addition to production issues from blinded or burst discs the cost of replacements is eye watering, so proper maintenance of Erema filter discs is a problem facing all managers of Erema extrusion lines. Yet the traditional cleaning method of burn-off of residual plastic only partially clears the filter. Here at Sonic Solutions we specialise in the cleaning of Erema laser filter screens. We have worked with some of the UK’s leading plastics recyclers over the last 3 years and developed a cleaning process that has seen replacement costs cut in half, throughput increased by over 10% and downtime significantly reduced for nearly all our customers. We are the first to acknowledge the contribution of our customers in the development of this process. We have also learnt the following top tips from our Erema using customers in the maintenance of these discs to reduce wear and tear and keep them running better and longer. We thought it might be helpful to managers of Erema hot melt extrusion lines to share these tips on how to maintain and clean their filter discs.
1: Scheduled Downtime
If you wait for your machine pressures to skyrocket between laser filter screen changes then you risk the screen bursting requiring costly replacement as well as impurities entering your finished product. Changing the screens at frequent and specific predetermined times brings many benefits, including a longer life for your screen and a reduction in unplanned downtime, one of the costliest, most stressful and embarrassing occurrences in any production line. The cost of more frequent cleaning is a fraction of the cost of unplanned and frequent downtime and resultant replacement costs.
2: Blade Change
Metal particulate can get trapped in the screen and dragged around and around the filter by a blade too blunt to cut through it, causing the deep scoring damage. Yet blades are inexpensive compared to the replacement cost of a screen. A regular customer of ours changes their blades every week in a scheduled downtime (they also change and clean their screens at this point). They report that some screens have lasted 8-9 cycles of burn off/ultrasonics as a consequence of this weekly changing of blades alone.
3: Screen Explosion
When re-using damaged or scored screen you should reduce the operating pressures and monitor carefully. You shouldn’t have to clean your filter core regularly since the material entering it should not be contaminated but on occasions when the screens burst, contaminated material will enter and block the core. It is then good practice to burn off and clean your core and pelletizing head as large pieces of wood or metal can enter the wedge in the holes, reducing throughput and cause another blockage. Usually a straightforward burn-off and jet wash will be adequate since there are no small holes to clean.
4: Burn off temperatures and times
For the best results when burning off your laser screens we have found that a temperature between 400-450 degrees centigrade works best. The oven should be slowly raised to this temperature and held there for around 3-4 hours. The oven should then be allowed to cool down gradually and not opened until the temperature falls below 250 Centigrade. This prevents flare-ups of any remaining plastics and rapid cooling of metal with the potential for warping and distortion. Larger items like the core, screens and blades with higher quantities of waste material to burn off may require longer to completely degrade the waste plastic. It is also important to allow sufficient space between items whilst in the oven so the heat can circulate properly and allow the molten plastic to melt away from the parts. Failure to do so can lead to an incomplete burn-off of the plastic contaminant on the items in the middle.
5: Ultrasonic cleaning and surface passivation
Traditional cleaning methodology for the filter discs tends to stop at a quick jet wash after burn off. Whilst this is fine for the heavy items like the core, blades, pelletising head and screws, the laser screens with their ultra fine mesh require a more complex multi-process clean. After burn-off and jet wash they still contain trapped, burnt carbonised plastic in the fine mesh and, if not dried properly, also rust heavily again blinding the micron sized holes. Ultrasonic cleaning in acid solution for around 3 hours cleans the screens to a near 100% cleanliness level. Furthermore, after the acid clean surface passivation in an rust inhibiting alkaline solution followed by a thorough drying ensures they remain clean and rust free until use. It is a classic case of the whole being greater than the sum of the parts. The whole process we employ to clean filter discs does take longer and cost more than the traditional method, but the benefits make the extra effort and cost well worth it. Laser filter screen lifetimes can be extended to double or triple compared to burning alone. Throughput can be increased by up to 20% because of reduced blinding. Extended times between blockages reduces downtime and bursts significantly. We know that the material type and quality going in has a lot to do with what goes on in the extruder, but a lot of that is out of your control. Maintenance of your hot melt filter line is something you can control. We hope the above tips are helpful.
If there’s anything you would like to ask us about the cleaning of your Erema discs and parts, we are more than happy to explore, advise and assist with whichever option works best for you and can offer hire or finance options. Contact our expert team today to discuss your requirements in more detail.
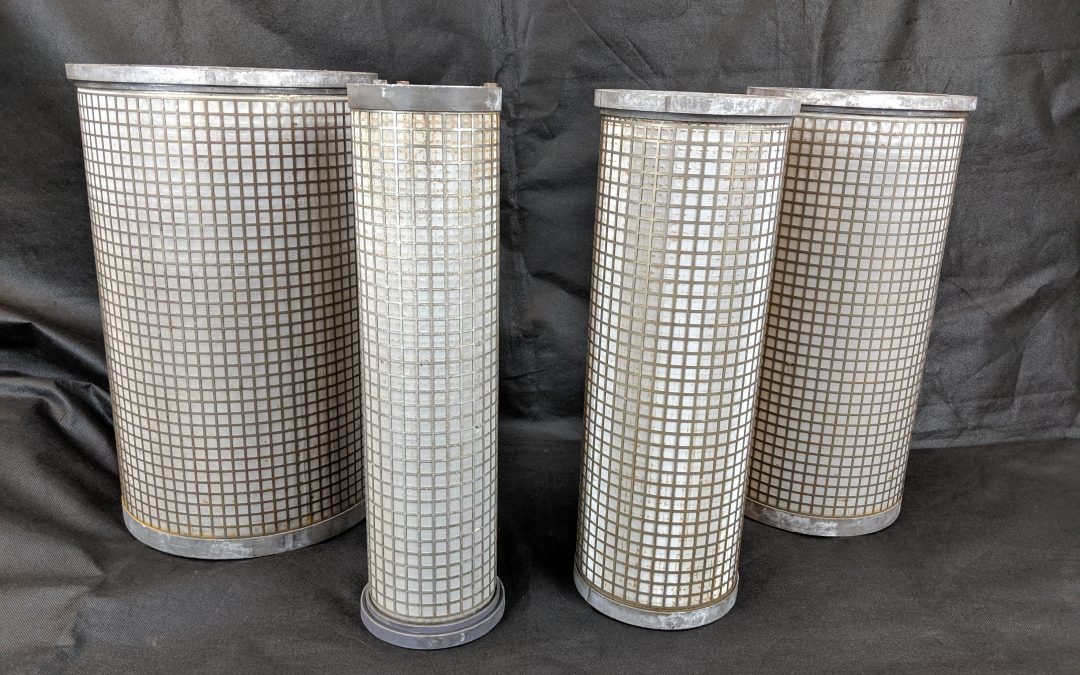
Typically the parts we ultrasonic clean for plastic recyclers are the filters, the heat exchangers, the print rollers and other precision-engineered parts that have small holes or internal cavities that require cleaning. They are difficult, if not impossible, to clean through conventional jet washing, soak or other abrasive methods. They also tend to have small particulate contamination and are expensive to replace.
Let’s look at each in turn;
Oil filters from hydraulic or lubrication systems for fast-moving parts.
Filters – these come in all shapes, sizes and function but the most common filters in plastic recycling are;
- Laser disc filters, or hot melt filters, used to filter remaining contamination from the plastic being treated;
- Extraction filters used to keep the work environment free of dust, oil and other airborne contaminants;
- Oil filters from hydraulic or lubrication systems for fast-moving parts.
Ultrasonic cleaning with the right chemistry for the relevant contaminant is ideal to remove small particulate from small openings and internal cavities typical of filters.
Heat exchangers – Most machines that work under high pressures and/or for long periods reach temperatures above their optimal working conditions and therefore require some form of cooling. This is done via heat exchangers, sometimes water-based, sometimes oil-based or even air-based coolers. By their very nature, the cooling media will create and then deposit particulate matter within the cooling mechanism. Over time this will reduce its effectiveness until it no longer performs its function. The removal of this contaminant is essential for it to continue doing its job. Ultrasonic cleaning reaches all surface areas of the part submerged in the cleaning solution, including internal cavities. With the right chemistry, any type of contaminant can be removed, from scale and rust to carbon and solidified oils.
Print Rollers – A lot of plastic is essentially packaging and therefore is ultimately printed upon to identify its contents or promote its producer. Many plastic recyclers offer some printing on the plastics they manufacture from recycled product. And this printing process on packaging material often users print rollers to carry the ink. These rollers are precision engineered to carry precise volumes of the ink but over time get dirty and cannot carry the necessary volumes of ink for good print quality. Ultrasonic cleaning is a well-proven method for restoring these rollers to full volume and optimal print quality.
All the parts mentioned above share common features. They are commonly highly engineered, high performance, high value and highly critical to the overall process of recycling plastic and converting to the desired end product. The alternative to ultrasonic cleaning is either replacement or highly laborious and time consuming manual cleaning that is usually only partially or temporarily effective.
If this sounds familiar because you either have the parts mentioned above or you have another cleaning issue then the chances are we can help, saving you time and money, improving the quality of your end product, and reducing your stress levels. Just get in touch and we’ll be happy to discuss your options, how we can help, and offer you a free trial clean to prove it will work for you.
For a free trial clean, a no-obligation discussion, or even a visit when the current situation permits, just call us on 01924 495 975 or e-mail Andrew on andrew@sonicsolutionsltd.com
A leading UK plastics recycler started having their Erema hot melt lasered filter screens ultrasonically cleaned instead of replaced after burning off. This resulted in annual cost savings on replacement discs that THEY estimated at £75,328.
In addition to these direct cost savings, their Engineering Support Manager reported increased productivity totalling over 20% from their recycling lines using the cleaned screens compared to the blocked old screens.
Other reported benefits included;
- Improved quality and consistency of the finished product;
- Increased reliability of production output;
- Higher capacity allowing quicker delivery;
- Improved ability to increase output in response to demand;
- Higher customer satisfaction from a more consistent product.
As their Engineering Support Manager concluded…
All in all a massive win for us, reducing costs and increasing revenue simultaneously in a very competitive market.
Calculations
Direct Cost Saving:
- 196 discs cleaned in 15 months = 13 per month
- Each disc lasts at least twice as long with ultrasonic cleaning (minimum 4 times burnt/ultrasonic cleaning, compared with maximum 2 burnt alone) = 50% reduction in replacement discs
- 4 discs cost €7,000 = £1521 each at 1.15 exchange rate less cleaning and carriage cost = net saving of £965.74.
Annual saving = 13 discs per month x 50% replacement x 12 months x £965.74 net cost = £75,328
Productivity Improvement
- In 2 cycles a burnt disc gives 120 + 20T = 140, an ultrasonically cleaned one gives 120 +120T = 240T. This represents a 71% improvement, assuming a new and ultrasonically cleaned disc have similar productivity rates
- A burnt disc lasts for 1 day giving 20T, an ultrasonically cleaned disc lasts an extra 4 days giving 120T = 30T per day. 20T to 30T per day is a 50% improvement in productivity
- If an ultrasonically cleaned disc goes for 5 days giving 120T this is 24T per day, compared to 20T in 1 day from a burnt disc = 20% uplift in productivity
This is far more complex to calculate with variables such as duration of discs in various states of cleanliness and their respective production rates to arrive at like for like productivities. We have gone for the lowest level of improvement based upon a conservative interpretation of the figures.
Lower Capital Cost
Erema’s approved cleaning method for cleaning these hot melt laser filter screens is to burn off the plastic and other residue blocking the holes in a vacuum oven followed by a jet wash. These ovens cost nearly £50,000 and still only result in a limited extension to the life of these disc filters. Our customer already uses this burning technology but finds our ultrasonic cleaning process dramatically extends the life and productivity of their discs. If you either don’t want the cost or hassle of burning your discs in-house then Sonic Solutions can do the burning for you along with the ultrasonic cleaning. You just ship the filter screens to us as they are when they come out your melt block. We burn them, ultrasonically clean them and return them within a few days, ready to use again.
Lower Cost on other parts
If you are replacing other process parts like dust filters, heat exchangers, dies and rollers because they’re dirty you could save yourself thousands of pounds by ultrasonically cleaning them instead. We’re also cleaning anilox print and costing rollers, dust particulate filters and heat exchangers for this customer, improving the quality of their end products, production throughput and operative productivity.
For a free trial clean, a no-obligation discussion, or even a visit when the current situation permits, just call us on 01924 495 975 or e-mail Ben on ben@sonicsolutionsltd.com
Here at Sonic Solutions Ltd, we have been running successful filter cleans for the past 15 years. Over that time we would say we have become experts in the field. Here is a 10 point checklist you can use yourself to perform thorough ultrasonic filter cleaning
- Check for damage
The first thing anyone should do after removing their filters from the process is to check for damage. There is no point in wasting time cleaning a filter that is going in the bin.
- Remove loose debris
We usually pre-clean the filters with our jetwash. This removes any loose debris that would contaminate your ultrasonic solution.
- Rinse off excess oil
Just the same as removing loose debris, if you are cleaning an oil filter, it is worth giving it a thorough pre-rinse to remove as much of the oil as possible. Having excess oil in the ultrasonic bath can lessen the cleaning effect and having the surface covered in oil means it will re-attach to the filter when it is taken out.
- Find the right chemistry
The contaminant you are looking to remove as well as the material the filter is made from dictates what ultrasonic cleaning chemicals you would use. For removing oil from a stainless steel filter, we would use a caustic solution. If the filter had aluminium parts, we could not use the same solution, as caustic reacts with aluminium. In this case, we would therefore use a citrus-based solution.
For any guidance on chemical selection, please give us a call and one of our experts can help you make the right choice.
- Ultrasonically clean with agitation
Once you have selected the right chemistry, place the filter in your ultrasonic bath and begin cleaning. The amount of time the filter will take to clean depends on how dirty it is. It is always a good idea to agitate the filter by swishing it around in the solution. This helps to dislodge any particulate that might be trapped within the filter mesh.
- Check it’s clean
Once you believe the filter is clean, take it out of the bath and inspect it to make sure it’s clean. This can be done by visually inspecting the filter to see if it is free of contamination. Depending on how fine the mesh is, we also do a water test. By testing the flow of water through the filter before and after a clean, it gives you an idea of how much the filter has been unblocked and if there is free flow of water, you can generally say it’s clean. (this method only works for less fine screens. For gas filters we generally rely on a visual inspection)
- Fully rinse the filter
After you are satisfied that the filter is clean, the next step is to rinse it to remove any loose particles and chemical residue left on the filter. When we clean filters on our site we use our high powered jetwash set to around 60 ͒C.
- Drying
Once you are sure the filter is free from contaminants and your cleaning solution, it is time to dry the filter. Depending on the filter type, you have a few options.
– Air-dry overnight
– Blow off with compressed air
– Place in a drying cabinet/line
– Place in front of a heater
We have used all these methods in the past so it’s up to you to decide what is best for your job. You just need to make sure it is completely dry before placing back into process as water on the mesh can leave it not functioning right.
- Final inspection and packing
Once they are dry, you should always perform a final inspection. This lets you assess whether the parts are completely clean and make sure they are not damaged. Although you inspected them for damage at the start, contaminants can hide small damage so it is best practice to check again before putting them back into process.
If the filters are not going straight back into process, it is a good idea to pack them securely to avoid them becoming dirty again while waiting for them to be put back in.
- Stay up to date with cleaning
As a cleaning company, we see it all the time. Customers who run filters till they no longer work which makes cleaning so much harder. It is advisable to put your filters onto a regular cleaning program where they are cleaned periodically to avoid any unplanned downtime caused by your filters becoming blocked.
This list is a basic guide of what we do to ultrasonically clean filters which will help you get the best results from your clean. If you don’t want to or can’t take on the cleaning yourself, we are always here to offer our services and help you get your filters back to their best.
To book a Free Trial Clean or discuss your filter cleaning requirements with one of our expert staff. Call us today on 01924 495 975 or email hello@sonicsolutionsltd.com

Filters are usually fine mesh which is exceptionally hard to clean manually. Here again the very nature of the small size of cavitation bubbles and the implosion sucking dirt off rather than blasting media on, makes the cleaning more precise and safer for the removal of contaminant from inside the fine mesh of the filter. Ultrasonic cleaning can really reduce labour, time and costs to keep the filtration essential to the process running as smoothly and effectively as possible. Chemistry is vital and again it is dependent on the contaminant that is on/in the filter such as carbon deposits, grease, organic/ food matter and oils etc. However whatever the contaminant with the appropriate chemistry ultrasonics can restore filters to optimal performance.