Celebrating a Milestone
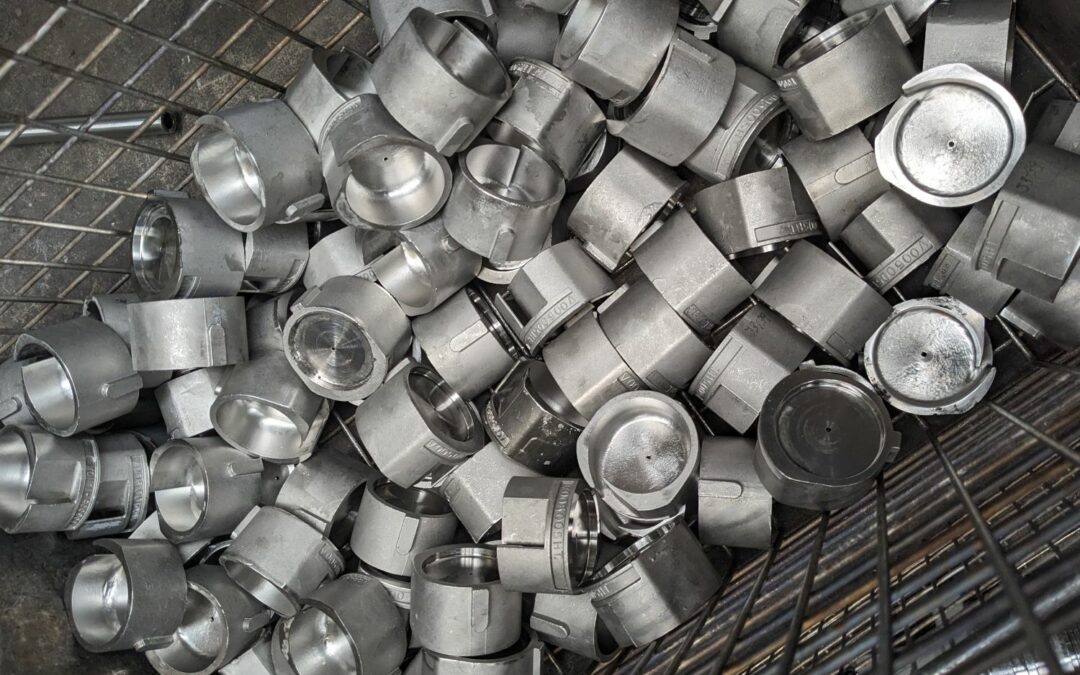
At Sonic Solutions, we pride ourselves on delivering top-notch industrial ultrasonic cleaning services and recently, we reached a significant milestone by completing one of our most substantial and impactful jobs to date.
This project, undertaken for an oil and gas industry client, showcased our capabilities and not only contributed to one of our best months ever, but also the biggest cost saving for the client!
The Project Overview
Scope and Scale
This extensive project involved cleaning over 500 highly engineered parts that were heavily coated with scale and crude oil. The parts were vital components of the client’s operations. The cleaning allowed a detailed inspection of the parts to be conducted, enabling the client to rationalise their procurement strategy for new parts and saving them in the region of £400,000 in replacement parts. This was an important part in the overall strategy to give them a better understanding of the integrity of the parts and likely eventual cost replacement.
Team Effort
Over the course of two weeks, our entire team was mobilised to ensure the job was completed efficiently and to the highest standards. The dedication and expertise of our team were pivotal in achieving the outstanding results.
Ultrasonic Cleaning: The Process
Our advanced ultrasonic cleaning process involves immersing parts in a specially formulated cleaning solution and then introducing high-frequency sound waves. These sound waves create tiny cavitation bubbles that effectively dislodge contaminants such as scale, oil, grease, and rust from the parts. After cleaning, the parts are thoroughly rinsed and dried, ready to be reintegrated into the client’s operations.
Benefits of Our Process
- Cost Savings: Cleaning parts at a fraction of the replacement cost.
- Efficiency: Rapid turnaround times.
- Effectiveness: Superior cleaning results, restoring parts to optimal condition.
- Environmental Sustainability: Reduced waste compared to part disposal and replacement.
Client Impact
Our client, expressed immense satisfaction with our services. The significant cost savings and the efficiency of our cleaning process were particularly appreciated. This project not only solidified our reputation as a reliable partner but also demonstrated the tangible benefits of our ultrasonic cleaning technology.
This landmark project underscores the transformative impact of our services. By opting for our ultrasonic cleaning, companies can achieve substantial savings and maintain the performance and longevity of their critical parts.
Are you looking to save money and enhance the efficiency of your operations? Experience the benefits of our ultrasonic cleaning services.
Contact Sonic Solutions today for a free trial clean.
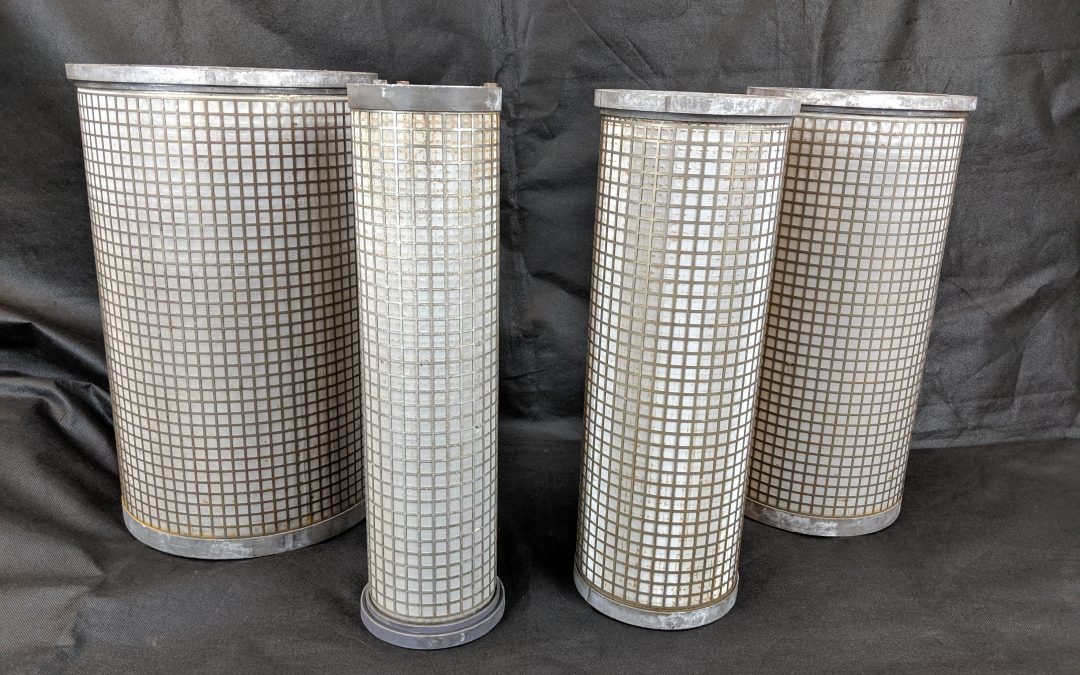
Here at Sonic Solutions Ltd, we have been running successful filter cleans for the past 15 years. Over that time we would say we have become experts in the field. Here is a 10 point checklist you can use yourself to perform thorough ultrasonic filter cleaning
- Check for damage
The first thing anyone should do after removing their filters from the process is to check for damage. There is no point in wasting time cleaning a filter that is going in the bin.
- Remove loose debris
We usually pre-clean the filters with our jetwash. This removes any loose debris that would contaminate your ultrasonic solution.
- Rinse off excess oil
Just the same as removing loose debris, if you are cleaning an oil filter, it is worth giving it a thorough pre-rinse to remove as much of the oil as possible. Having excess oil in the ultrasonic bath can lessen the cleaning effect and having the surface covered in oil means it will re-attach to the filter when it is taken out.
- Find the right chemistry
The contaminant you are looking to remove as well as the material the filter is made from dictates what ultrasonic cleaning chemicals you would use. For removing oil from a stainless steel filter, we would use a caustic solution. If the filter had aluminium parts, we could not use the same solution, as caustic reacts with aluminium. In this case, we would therefore use a citrus-based solution.
For any guidance on chemical selection, please give us a call and one of our experts can help you make the right choice.
- Ultrasonically clean with agitation
Once you have selected the right chemistry, place the filter in your ultrasonic bath and begin cleaning. The amount of time the filter will take to clean depends on how dirty it is. It is always a good idea to agitate the filter by swishing it around in the solution. This helps to dislodge any particulate that might be trapped within the filter mesh.
- Check it’s clean
Once you believe the filter is clean, take it out of the bath and inspect it to make sure it’s clean. This can be done by visually inspecting the filter to see if it is free of contamination. Depending on how fine the mesh is, we also do a water test. By testing the flow of water through the filter before and after a clean, it gives you an idea of how much the filter has been unblocked and if there is free flow of water, you can generally say it’s clean. (this method only works for less fine screens. For gas filters we generally rely on a visual inspection)
- Fully rinse the filter
After you are satisfied that the filter is clean, the next step is to rinse it to remove any loose particles and chemical residue left on the filter. When we clean filters on our site we use our high powered jetwash set to around 60 ͒C.
- Drying
Once you are sure the filter is free from contaminants and your cleaning solution, it is time to dry the filter. Depending on the filter type, you have a few options.
– Air-dry overnight
– Blow off with compressed air
– Place in a drying cabinet/line
– Place in front of a heater
We have used all these methods in the past so it’s up to you to decide what is best for your job. You just need to make sure it is completely dry before placing back into process as water on the mesh can leave it not functioning right.
- Final inspection and packing
Once they are dry, you should always perform a final inspection. This lets you assess whether the parts are completely clean and make sure they are not damaged. Although you inspected them for damage at the start, contaminants can hide small damage so it is best practice to check again before putting them back into process.
If the filters are not going straight back into process, it is a good idea to pack them securely to avoid them becoming dirty again while waiting for them to be put back in.
- Stay up to date with cleaning
As a cleaning company, we see it all the time. Customers who run filters till they no longer work which makes cleaning so much harder. It is advisable to put your filters onto a regular cleaning program where they are cleaned periodically to avoid any unplanned downtime caused by your filters becoming blocked.
This list is a basic guide of what we do to ultrasonically clean filters which will help you get the best results from your clean. If you don’t want to or can’t take on the cleaning yourself, we are always here to offer our services and help you get your filters back to their best.
To book a Free Trial Clean or discuss your filter cleaning requirements with one of our expert staff. Call us today on 01924 495 975 or email hello@sonicsolutionsltd.com
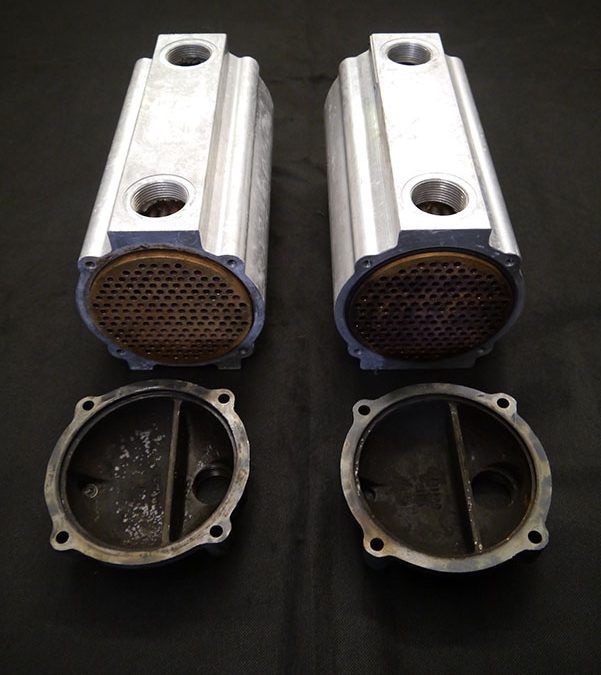
This article looks at the 10 key considerations we make when running a successful ultrasonic heat exchanger clean.
- What’s it used for?
Heat exchangers, intercoolers and radiators, whatever people like to call them, they kind of do the same thing. They come in all different shapes and sizes and are used totally different across the spectrum of industries. The reason we always try and find out what its used for is that it can better prepare us for the type of contaminant we might be facing. i.e a marine heat exchanger can be not only covered in general dirt and grease but also salt and scale.
- Identify all possible contaminants
Just knowing what it’s used for isn’t enough to complete the picture, we need to know every possible type of contaminant we could be facing. Many times we have been told the only contaminant is grease and dirt, only to find out there is burnt on carbon inside causing serious blockages. Fail to prepare, prepare to fail.
- Blockages or extreme build-up?
When heat exchangers arrive the first thing we do is check for severe problems, as a simple job can turn into a long hands-on labour intensive day. We usually see these types of thing in hard water areas, for instance, a coffee brewery in Bristol thought they just needed a simple de-scaling job but we found out later that the entire internals were blocked with a solid block of calcium deposits. 3 days later with hammer and chisels and some strong chemicals, we got the result, but usually this would have been around half a day at best.
- What is it made from?
We have to know what the item is made of as it directly affects the types of chemicals we use and also how long we can leave it in certain ultrasonic baths for. For example, the soft easily bent aluminium fins on many radiators and intercoolers must be treated with extreme care both physically and chemically or risk irreversible damage.
- Choosing the right chemistry
As mentioned some chemicals can harm certain metals, therefore we have to be sure that the cleaning solution will not only clean it but not damage it. This is where many, many years of experience in the ultrasonic cleaning business helps. 99 times out of 100 we know exactly what chemical will attack the contaminant whilst leaving the items completely unharmed.
- Time
Almost every type of heat exchanger has copper internal pipework for the transfer of water or oil, they also commonly have brass ends holding all the pipes in place. This is important to know because copper in heat and caustic chemical solution likes to leave the pipe and plate itself over the brass. The time is important because the quicker you can have the contaminant cleaned the less likely there is to be a transfer of copper to brass.
- Monitor and rinse
Because elements of a heat exchanger are very prone to damage you must carefully monitor it whilst in the ultrasonic bath. Always checking for “fizzing” this occurs when aluminium reacts with an uninhibited alkaline caustic solution, so if you see little white bubbles rising up out of the parts then immediately take it out and rinse off as it is literally being dissolved into the solution. The other thing you must take care of is the way it lays in the tank. You must suspend it or have none of the fins touching any steel baskets or the tank base, irreversible damage will be done if not properly placed in the ultrasonic cleaning bath.
- Rinse and repeat
We like to take the parts out of the tank periodically to give them a complete spray down and rinse so we can check to see if it’s necessary to stay in the ultrasonic bath. If we are not satisfied then it will go back in for further cleaning
- Drying
We have a number of different methods when it comes to drying. A system we have found most effective is using high powered compressed air to blow between all the aluminium fins and down inside the copper pipework, this is brilliant at not only drying but also for removing any little tiny particulate matter that was left behind from the cleaning process. After the compressed air dry if we feel it needs further drying we put it in the drying cabinet for up to 1 hour until we are completely satisfied it’s water-free.
- Packaging
This is one of the most important factors because all the hard work done to achieve the brilliant cleaning result could all be undone with poor packaging. Protect the fins, strap it down and cover it with layers of progressively stronger material starting with foam or bubble wrap then carboard and preferably a lid on a crate of some sort, ensuring all void space is filled.
To book a Free Trial Clean or discuss your heat exchanger cleaning requirements with one of our expert staff. Call us today on 01924 495 975 or email hello@sonicsolutionsltd.com